LCG environments
Software Environment
The software environment for ML application trainings can be setup in different ways. In this page we focus on the CERN lxplus environment.
LCG release software
Checking out an ideal software bundle with Cuda support at http://lcginfo.cern.ch/, one can set up an LCG environment by executing
source /cvmfs/sft.cern.ch/lcg/views/<name of bundle>/**x86_64-centos*-gcc11-opt**/setup.sh
On lxplus-gpu nodes, usually equipped with AlmaLinux 9.1 (also called Centos9), one should use the proper lcg release. At the time of writing (May 2023) the recommended environment to use GPUs is:
source /cvmfs/sft.cern.ch/lcg/views/LCG_103cuda/x86_64-centos9-gcc11-opt/setup.sh
Customized environments
One can create custom Python environment using virtualenv or venv tools, in order to avoid messing up with the global python environment.
The user has the choice of building a virtual environment from scratch or by basing on top of a LCG release.
Virtual environment from scratch
The first approach is cleaner but requires downloading the full set of libraries needed for pytorch or TensorFlow (very heavy). Moreover the compatibility with the computing environment (usually lxplus-gpu) is not guaranteed.
-
Create the environment in a folder of choice, usually called
myenvpython3 -m venv --system-site-packages myenv source myenv/bin/activate # activate the environment # Add following line to .bashrc if you want to activate this environment by default (not recommended) # source "/afs/cern.ch/user/<first letter of your username>/<username>/<path-to-myenv-folder>/myenv/bin/activate" -
To install packages properly, one should carefully check the CUDA version with
nvidia-smi(as shown in figure before), and then find a proper version, pytorch is used as an example.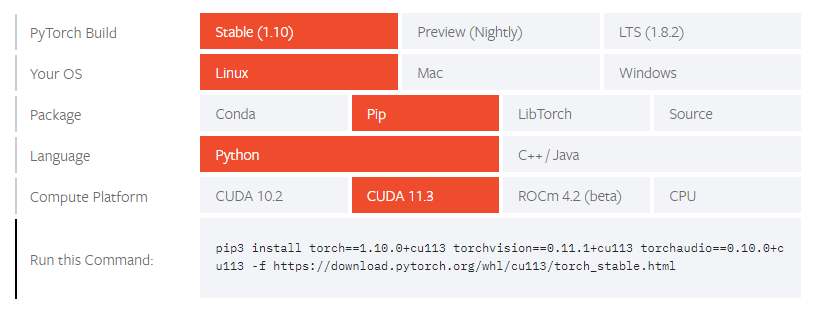
# Execute the command shown in your terminal
pip install torch==1.10.0+cu113 torchvision==0.11.1+cu113 torchaudio==0.10.0+cu113 -f https://download.pytorch.org/whl/cu113/torch_stable.html
pip install jupyterlab matplotlib scikit-hep # install other packages if they are needed
Virtual environment on top of LCG
Creating a virtual environment only to add packages on top of a specific LCG release can be a very effective and inexpesive way to manage the Python environment in lxplus.
N.B A caveat is that the users needs to remember to activate the lcg environment before activating his virtual environment.
-
Activate the lcg environment of choice
source /cvmfs/sft.cern.ch/lcg/views/LCG_103cuda/x86_64-centos9-gcc11-opt/setup.sh -
Create the enviroment as above
python3 -m venv --system-site-packages myenv source myenv/bin/activate # activate the environment -
Now the user can work in the environment as before but Pytorch and tensorflow libraries will be available. If a single package needs to be update one can do
pip install --upgrade tensorflow=newer.version
This will install the package in the local environment.
At the next login, the user will need to perform these steps to get back the environment:
source /cvmfs/sft.cern.ch/lcg/views/LCG_103cuda/x86_64-centos9-gcc11-opt/setup.sh
source myenv/bin/activate
Conda environments
Using conda package manager: conda pacakge manager is more convenient to install and use. To begin with, obtaining an Anaconda or Miniconda installer for Linux x86_64 platform. Then execute it on Lxplus.
1. Please note that if you update your shell configuration (e.g. `.bashrc` file) by `conda init`, you may encounter failure due to inconsistent environment configuration.
2. Installing packages via `conda` also needs special consideration on selecting proper CUDA version as discussed in `pip` part.