lxplus-gpu.cern.ch
How to use it?
lxplus-gpu are special lxplus nodes with GPU support. You can access these nodes by executing
ssh <your_user_name>@lxplus-gpu.cern.ch
Software Environment
Four examples are given below to show how to set up a software environment properly.
-
Using LCG release software: after checking out an ideal software bundle with Cuda support at
http://lcginfo.cern.ch/, one can set up an LCG environment by executingsource /cvmfs/sft.cern.ch/lcg/views/<name of bundle>/**x86_64-centos7-gcc8-opt**/setup.sh -
Using
pip, especially withvirtualenv: usingpiponly to install software may mess up the global environment. Thus, it is better to create a "virtual environment" withvirtualenvin order to eliminate potential issues in the package environment.-
As on lxplus, the default
virtualenvcommand is installed withpython2, it better to firstly installvirtualenvwithpython3pip3 install virtualenv --user # Add following line to .bashrc and re-log in or source .bashrc # export PATH="/afs/cern.ch/user/<first letter of your username>/<username>/.local/bin:$PATH" -
Make sure you have
virtualenvwithpython3correctly. Then go to the desired directory and create a virtual environmentvirtualenv <env name> source <env name>/bin/activate # now you are inside the virtual environment, your shell prompt will begin with "(<env name>)" -
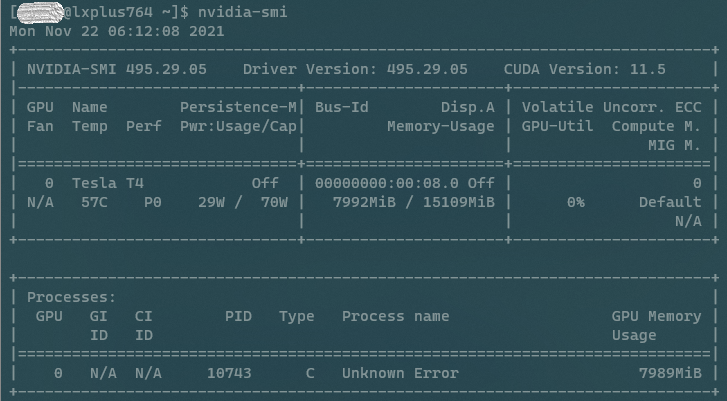
To install packages properly, one should carefully check the CUDA version with
nvidia-smi(as shown in figure before), and then find a proper version, pytorch is used as an example.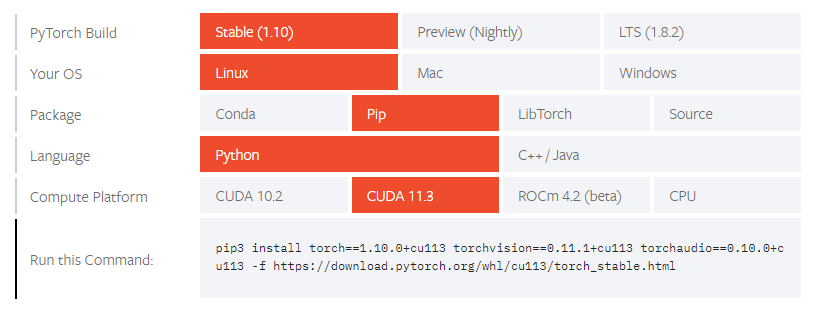 3. Using
# Execute the command shown in your terminal pip3 install torch==1.10.0+cu113 torchvision==0.11.1+cu113 torchaudio==0.10.0+cu113 -f https://download.pytorch.org/whl/cu113/torch_stable.html pip3 install jupyterlab matplotlib scikit-hep # install other packages if they are neededcondapackage manager:condapacakge manager is more convenient to install and use. To begin with, obtaining anAnacondaorMinicondainstaller for Linux x86_64 platform. Then execute it on Lxplus. -
Please note that if you update your shell configuration (e.g.
.bashrcfile) byconda init, you may encounter failure due to inconsistent environment configuration. - Installing packages via
condaalso needs special consideration on selecting proper CUDA version as discussed inpippart.
-
-
Container based solution: The unpacked.cern.ch mount on CVMFS contains many singularity images, some of which are suitable for machine learning applications. A description of each of the images is beyond the scope of this document. However, if you find an image which is useful for your application, you can use if by running a Singularity container with the appropriate options. For example:
singularity run --nv --bind <bind_mount_path> /cvmfs/unpacked.cern.ch/<path_to_image>
Examples
After installing package, you can then use GPU based machine learning algorithms. Two examples are supplied as an example.
-
The first example aims at using a CNN to perform handwritten digits classification with
MNISTdataset. The whole notebook can be found at PytorchMNIST. This example is modified from an officialpytorchexample. -
The second example is modified from the simple MLP example from
weaver-benchmark. The whole notebook can be found at TopTaggingMLP.